Disclaimer: I have recently migrated my setup to a dedicated mini-PC.
Smartphones are fundamentally not designed for 24/7 server workloads due to
battery and thermal constraints. Unless you have a specific use case, I do not
recommend running this as a permanent solution.
Lately, I’ve had some spare time and decided to repurpose an old Android phone into a lightweight NAS by installing AList. Here is a brief guide sharing my hands-on experience and configurations. If you spot any mistakes, feel free to point them out in the comments section below!
1 Installing AList
For this project, I used AList-lite, a native Android app built on the open-source OList project. It requires no complex command-line setup—just install the APK, and you are good to go. Since there are plenty of basic installation tutorials online, I won’t re-invent the wheel here. You can refer to these links for step-by-step setup:
Once installed, follow the official documentation to complete the basic setup. The UI is clean and self-explanatory. Once the service starts, you can easily access it within your local area network (LAN) from any device connected to the same Wi-Fi network or mobile hotspot. Alternatively, you can share the connection via USB tethering.
Note: My university network does not behave like a standard LAN environment, which brought up some unique routing challenges.
2 External Access
Since I don’t have a public IPv4 address and my university network enforces strict firewall rules on IPv6, traditional port forwarding was out of the question. Funnily enough, I noticed that simply connecting both my primary phone and the old phone to the campus VPN allowed them to communicate, though I haven’t deep-dived into the underlying routing mechanics yet.
2.1 P2P Hole Punching (Tailscale / ZeroTier)
Initially, I tried utilizing mesh VPN services like Tailscale to establish a peer-to-peer connection, following a guide on Coolapk:
While the setup was straightforward, my remote download speeds capped out at a miserable few hundred KB/s. After checking our campus forum, I realized our wireless network uses a strict Symmetric NAT (NAT4). In a NAT4 environment, direct P2P hole punching almost always fails, forcing traffic to relay through overseas DERP servers, which introduces severe latency and throttling.
I also looked into commercial solutions like PeanutHull (花生壳), but the free tier only offers 1 GB of monthly data—practically useless for storage traffic.
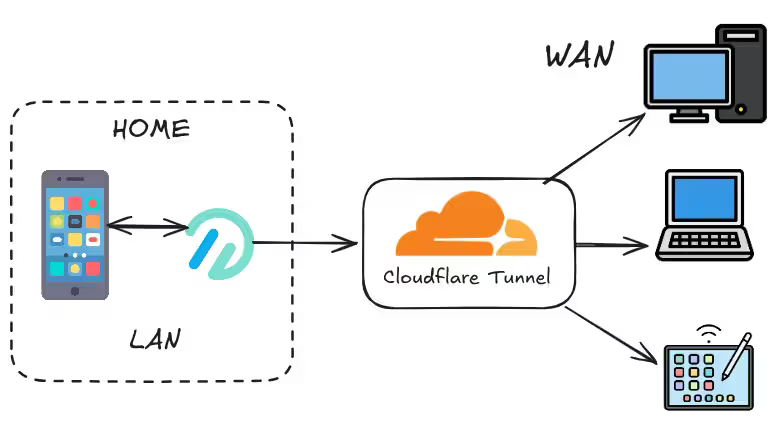
2.2 Cloudflare Tunnel
2.2.1 Register a Domain on Cloudflare
You will need a Cloudflare account and a custom domain. If your domain is currently with another registrar, migrate your DNS nameservers to Cloudflare.
Once you add your site, Cloudflare will provide two custom nameservers. Update your domain settings at your registrar to point to these servers.
I highly recommend setting up a subdomain (e.g., pan.yourdomain.com) for the
tunnel traffic instead of your root domain.
The following steps are executed entirely inside Termux.
2.2.2 Installing cloudflared in Termux
Update your packages and install the required tools:
pkg update && pkg upgrade
pkg install wget curl cloudflared
2.2.3 Creating the Tunnel
Authenticate your Cloudflare account inside Termux:
cloudflared tunnel loginThe command will output a authentication URL:
Please open the following URL and re-run this command with the returned certificate:
https://dash.cloudflare.com/argotunnel?callback=https%3A%2F%2Flogin.cloudflareaccess.org%2F...
Copy and paste this URL into your browser, select your domain, and authorize the connection. Back in Termux, a successful login will output:
You have successfully logged in.
If you wish to copy your credentials to a server, they have been saved to:
/data/data/com.termux/files/home/.cloudflared/cert.pem
(If the authentication fails due to network timeout, simply hit Ctrl+C and retry the login command).
Now, spin up a new tunnel daemon:
cloudflared tunnel create my-android-tunnelUpon creation, Termux will generate a credentials JSON file:
Tunnel credentials written to /data/data/com.termux/files/home/.cloudflared/12345678-1234-1234-1234-123456789abc.json
Created tunnel my-android-tunnel with id 12345678-1234-1234-1234-123456789abc
Make a note of this generated Tunnel ID; we will need it for the configuration
file.
You can verify the status by running:
cloudflared tunnel list2.2.4 Configuring the Tunnel
nano ~/.cloudflared/config.ymltunnel: 12345678-1234-1234-1234-123456789abc
credentials-file: /data/data/com.termux/files/home/.cloudflared/12345678-1234-1234-1234-123456789abc.json
ingress:
- hostname: yourdomain.com
service: http://localhost:5244
- service: http_status:4042.2.5 Routing DNS and Launching
cloudflared tunnel route dns my-android-tunnel yourdomain.comcloudflared tunnel run my-android-tunnelAt this point, your AList server is exposed securely to the web. Open a browser and verify by navigating to https://pan.yourdomain.com. To terminate the session, simply hit Ctrl+C.
3 Real-Time Hardware Monitoring via MacroDroid
The tutorial mentioned earlier inspired me to take telemetry a step further. I configured MacroDroid to periodically dump system metrics into a JSON file stored on the server. Then, I injected a custom JavaScript floating widget into the AList global header to parse and display this real-time system status.
3.1 MacroDroid Configuration
Create a new macro in MacroDroid:Trigger: Every 5 minutes.Action: Write File Name: device_status.json Option: Overwrite file.
{
  "battery": {
    "level": "{battery}",
    "temperature": "{battery_temp}"
  },
  "memory": {
    "total": "{ram_total}",
    "available": "{ram_available}"
  },
  "storage": {
    "total": "{storage_internal_total}",
    "free": "{storage_internal_free}"
  },
  "time": {
    "formatted": "{hour_0}:{minute}:{second}"
  }
}
3.2 AList Admin Setting Injection
Navigate to your AList Admin Dashboard Settings Style, and inject the components into their respective sections.
<style>
  /* Floating Action Button Style */
  .device-monitor-fab {
      position: fixed;
      left: 20px;
      top: 75%;
      transform: none;
      width: 48px;
      height: 48px;
      background: #007bff;
      border: none;
      border-radius: 50%;
      cursor: pointer;
      box-shadow: 0 4px 12px rgba(0, 123, 255, 0.3);
      z-index: 9999;
      display: flex;
      align-items: center;
      justify-content: center;
      font-size: 20px;
      transition: all 0.3s ease;
  }
  .device-monitor-fab:hover {
      transform: translateY(-50%) scale(1.1);
      box-shadow: 0 6px 16px rgba(0, 123, 255, 0.4);
  }

  /* Telemetry Panel Style */
  .device-info-panel {
      position: fixed;
      left: 80px;
      top: 50%;
      transform: translateY(-50%);
      width: 280px;
      background: rgba(255, 255, 255, 0.95);
      border: 1px solid rgba(0, 0, 0, 0.1);
      border-radius: 12px;
      padding: 16px;
      box-shadow: 0 8px 24px rgba(0, 0, 0, 0.15);
      z-index: 9998;
      backdrop-filter: blur(10px);
      display: none;
  }

  .device-info-panel.dark {
      background: rgba(30, 30, 30, 0.95);
      border-color: rgba(255, 255, 255, 0.1);
      color: #ffffff;
  }

  .device-info-header {
      text-align: center;
      margin-bottom: 12px;
      font-size: 14px;
      font-weight: 600;
      opacity: 0.8;
  }

  .device-info-list {
      display: flex;
      flex-direction: column;
      gap: 8px;
  }

  .device-info-item {
      display: flex;
      align-items: center;
      padding: 6px 0;
  }

  .device-info-icon {
      width: 20px;
      margin-right: 8px;
      text-align: center;
      font-size: 14px;
  }

  .device-info-content {
      flex: 1;
      min-width: 0;
  }

  .device-info-value {
      font-size: 12px;
      font-weight: 500;
      margin-bottom: 3px;
      opacity: 0.9;
  }

  .progress-bar {
      width: 100%;
      height: 3px;
      background: rgba(128, 128, 128, 0.2);
      border-radius: 1.5px;
      overflow: hidden;
  }

  .progress-fill {
      height: 100%;
      border-radius: 1.5px;
      transition: width 0.3s ease;
  }

  .battery-progress {
      background: linear-gradient(90deg, #ff4757, #ffa502, #2ed573);
  }

  .memory-progress {
      background: linear-gradient(90deg, #3742fa, #5352ed);
  }

  .storage-progress {
      background: linear-gradient(90deg, #ff6b6b, #feca57);
  }

  .device-status-offline {
      text-align: center;
      padding: 12px;
      opacity: 0.5;
      font-style: italic;
      font-size: 11px;
  }

  .last-update {
      text-align: center;
      font-size: 10px;
      opacity: 0.4;
      margin-top: 8px;
      border-top: 1px solid rgba(128, 128, 128, 0.2);
      padding-top: 8px;
  }

  .close-btn {
      position: absolute;
      top: 8px;
      right: 8px;
      width: 20px;
      height: 20px;
      border: none;
      background: none;
      cursor: pointer;
      font-size: 16px;
      opacity: 0.5;
      display: flex;
      align-items: center;
      justify-content: center;
  }

  .close-btn:hover {
      opacity: 1;
  }
  }
</style>
Global Body Content:
<button id="deviceMonitorFab" class="device-monitor-fab" title="Device Status">
📱
</button>
<div id="deviceInfoPanel" class="device-info-panel">
<button class="close-btn" onclick="closeDevicePanel()">×</button>
<div class="device-info-header">Device Status</div>
<div id="deviceInfoList" class="device-info-list">
<!-- Device info will be loaded here -->
</div>
<div
id="deviceOfflineMsg"
class="device-status-offline"
style="display: none;"
>
Device offline or data unavailable
</div>
<div id="lastUpdateTime" class="last-update"></div>
</div>
<script>
(function () {
// Get base URL
function getBaseUrl() {
const currentUrl = window.location.href;
const urlParts = currentUrl.split("/");
return `${urlParts[0]}//${urlParts[2]}`;
}
// Format storage size
function formatStorage(total, free) {
const totalNum = parseFloat(total);
const freeNum = parseFloat(free);
const used = totalNum - freeNum;
const usedPercent = Math.round((used / totalNum) * 100);
return {
total: total,
free: free,
used: used.toFixed(1) + total.slice(-2),
usedPercent: usedPercent,
};
}
// Format memory size
function formatMemory(total, available) {
const totalNum = parseFloat(total);
const availableNum = parseFloat(available);
const used = totalNum - availableNum;
const usedPercent = Math.round((used / totalNum) * 100);
return {
total: total,
available: available,
used: used.toFixed(2) + total.slice(-2),
usedPercent: usedPercent,
};
}
// Render device info
function renderDeviceInfo(data) {
const storage = formatStorage(data.storage.total, data.storage.free);
const memory = formatMemory(data.memory.total, data.memory.available);
const batteryLevel = parseInt(data.battery.level);
document.getElementById("deviceInfoList").innerHTML = `
<div class="device-info-item">
<div class="device-info-icon">🔋</div>
<div class="device-info-content">
<div class="device-info-value">${data.battery.level}%</div>
<div class="progress-bar">
<div class="progress-fill battery-progress" style="width: ${batteryLevel}%"></div>
</div>
</div>
</div>
<div class="device-info-item">
<div class="device-info-icon">🌡</div>
<div class="device-info-content">
<div class="device-info-value">${data.battery.temperature}°C</div>
</div>
</div>
<div class="device-info-item">
<div class="device-info-icon">🧠</div>
<div class="device-info-content">
<div class="device-info-value">${memory.used}/${memory.total}</div>
<div class="progress-bar">
<div class="progress-fill memory-progress" style="width: ${memory.usedPercent}%"></div>
</div>
</div>
</div>
<div class="device-info-item">
<div class="device-info-icon">💿</div>
<div class="device-info-content">
<div class="device-info-value">${storage.used}/${storage.total}</div>
<div class="progress-bar">
<div class="progress-fill storage-progress" style="width: ${storage.usedPercent}%"></div>
</div>
</div>
</div>
<div class="device-info-item">
<div class="device-info-icon">🕒</div>
<div class="device-info-content">
<div class="device-info-value">${data.time.formatted}</div>
</div>
</div>
`;
}
// Fetch device status
async function fetchDeviceStatus() {
try {
const baseUrl = getBaseUrl();
const response = await fetch(
`${baseUrl}/d/DeviceStatus/device_status.json?t=${Date.now()}`,
);
if (!response.ok) {
throw new Error("Network response was not ok");
}
const data = await response.json();
document.getElementById("deviceInfoList").style.display = "flex";
document.getElementById("deviceOfflineMsg").style.display = "none";
renderDeviceInfo(data);
const now = new Date();
document.getElementById("lastUpdateTime").textContent =
`Last update: ${now.getHours().toString().padStart(2, "0")}:${now
.getMinutes()
.toString()
.padStart(2, "0")}:${now.getSeconds().toString().padStart(2, "0")}`;
} catch (error) {
console.log("Failed to fetch device status:", error);
document.getElementById("deviceInfoList").style.display = "none";
document.getElementById("deviceOfflineMsg").style.display = "block";
document.getElementById("lastUpdateTime").textContent =
"Connection failed";
}
}
// Toggle panel visibility
function togglePanel() {
const panel = document.getElementById("deviceInfoPanel");
const isVisible = panel.style.display === "block";
if (isVisible) {
panel.style.display = "none";
} else {
panel.style.display = "block";
fetchDeviceStatus();
}
}
// Close panel
window.closeDevicePanel = function () {
document.getElementById("deviceInfoPanel").style.display = "none";
};
// Detect dark theme
function updateTheme() {
const panel = document.getElementById("deviceInfoPanel");
const isDark =
document.documentElement.classList.contains("hope-ui-dark") ||
document.body.classList.contains("dark") ||
document.body.classList.contains("hope-ui-dark") ||
window.matchMedia("(prefers-color-scheme: dark)").matches;
if (isDark) {
panel.classList.add("dark");
} else {
panel.classList.remove("dark");
}
}
// Click outside to close
document.addEventListener("click", function (event) {
const panel = document.getElementById("deviceInfoPanel");
const fab = document.getElementById("deviceMonitorFab");
if (
panel.style.display === "block" &&
!panel.contains(event.target) &&
!fab.contains(event.target)
) {
panel.style.display = "none";
}
});
// Initialize
function init() {
const fab = document.getElementById("deviceMonitorFab");
if (fab) {
fab.addEventListener("click", togglePanel);
}
updateTheme();
// Watch for theme changes
const observer = new MutationObserver(updateTheme);
observer.observe(document.documentElement, {
attributes: true,
attributeFilter: ["class"],
});
observer.observe(document.body, {
attributes: true,
attributeFilter: ["class"],
});
// Auto refresh when panel is open
setInterval(() => {
const panel = document.getElementById("deviceInfoPanel");
if (panel && panel.style.display === "block") {
fetchDeviceStatus();
}
}, 30000);
}
// Start when DOM is ready
if (document.readyState === "loading") {
document.addEventListener("DOMContentLoaded", init);
} else {
init();
}
})();
</script>In my environment, the macro runs every 5 minutes to minimize battery drain, while the frontend dashboard fetches updates every 30 seconds when open. You can tune these intervals to fit your needs.
4. Visual Customization
I didn’t heavily customize the AList interface, opting instead for a minimalist, fully transparent UI. If you want to replicate the look, check out this styling breakthrough from the Moe Community:
5. Battery Preservation (TODO)
I will soon expand this post to include efficient daemon process management (keeping cloudflared alive automatically) and advanced power-saving solutions to protect the battery from overheating during prolonged server runtimes.